How to Get Great Looking Tires and Trim
While the vast majority of the steps and corrections we’ve done have mainly been focused on the paint surface of the car, we do realize that that is not the only part of the car. Even if it is the most noticeable. There are surfaces of the car that are usually over-looked if the whole car is in the same rough shape. However, if most of the car is pristine, then the few parts that aren’t will draw the eye of any on-lookers! So, we need to make sure that all noticeable surfaces are equally as detailed as the paint we have just finished slaving over!
But, which parts, other than the paint, are the most important? Well, that is exactly the question we are here to answer with this informational.
Sure, you could spend days upon days going over every inch of your car with a fine-tooth comb, but there comes a point where people aren’t going to notice the extremely small stuff.
There are really only a couple non-paint surfaces that people are going to notice at all, so let’s go over how to care for those surfaces, one by one!
Step 1: The Tires
The tires of your car are far and away the most abused part of your vehicle! (except for maybe your horn, if you’re a bit of a hot head!) This is why they need to be replaced so frequently.
These tires can’t help but fade, dull, crack, and wear over time with all the stress, strain, and contamination that they are subjected to every time you take a cruise.
Thankfully, we have already taken the time to clean our tires off when we washed the car, but now we want to make sure to keep them that way. No, we want to make them look even better than before!
So, we are going to apply some durable protection and a nice matte gloss!
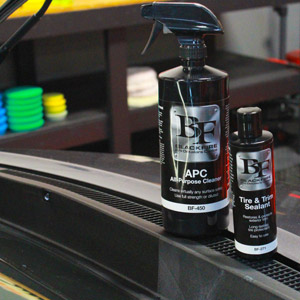
This process is actually going to be quite simple thanks to our BLACKFIRE Trim & Tire Protectant.
This product has a couple of properties that make it the perfect choice for our purposes.
1. It has an easy aerosol application that will ensure a quick and consistent layer of product.
2. It finishes off with a subtle, matte finish.
3. It dries quickly and will not sling.
We are going to start off by spraying an even layer of BLACKFIRE Trim & Tire Protectant all around the surface of the tire.
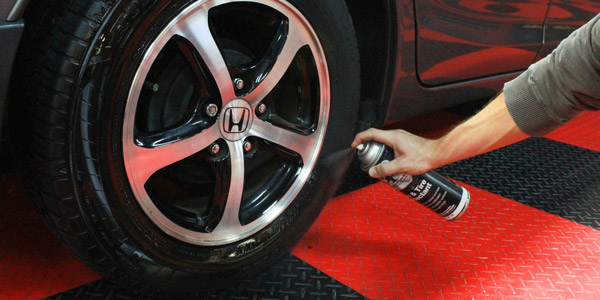
After we have done that, we will let it sit on the surface for a bit to allow it to adhere properly.
Once we feel it has been given enough time to be absorbed into the rubber and provide the matte gloss and protection we are looking for, we are going to wipe off any excess product that remains on the tire.

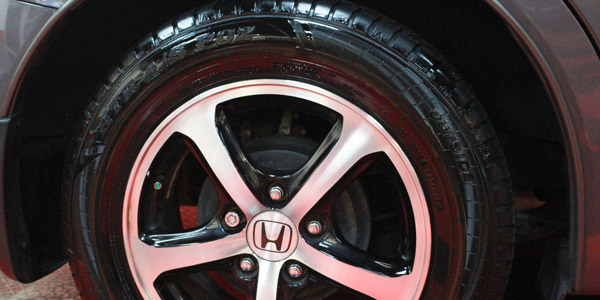
What we end up with is a dark, well-protected, low-gloss tire that can resist further damage and complete the smooth and flawless over-all look of the rest of the car!
Step 2: The Trim
Most trim is made out of either plastic or rubber. Both of these materials are not exactly known for their resilience. In fact, more often than not, these surfaces will dry, crack, and fade before you even need to get your first oil change!
And once they are damaged, bringing them back is a task and a half.
While the trim on this car isn’t perfect, it’s thankfully not too far gone. All we will need to do is make sure it is plenty clean and then slap down protection!
First off, to clean it, we are going to use our BLACKFIRE APC All-Purpose Cleaner. We won’t really need anything too fancy to clean it since we already gave our car a total wash. The APC and a simple microfiber towel will be able to loosen and wipe off any remaining contaminants that may have stuck around on the surface of our trim.
First, we will give the trim surface a good spraying with our BLACKFIRE APC All-Purpose Cleaner.

We’ll give it about a minute to do it’s work before wiping it clean with our Microfiber All Purpose & Wheel Detailing Towel

Now that we can be sure that the surface is perfectly clean, we will need to prevent the delicate trim from the horrors of oxidation and fading.
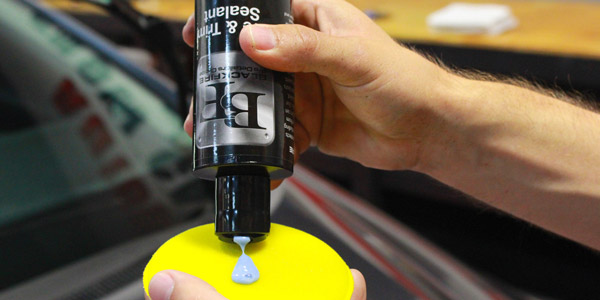
To do this, we will use our BLACKFIRE Tire & Trim Sealant.
Because our plastic trim is a less absorbent surface than our rubber tires, the thick viscosity of this product will allow the trim to be more wholly absorbed before any evaporation. It will still give us a nice matte finish to our plastic trim though!
The application process is pretty simple and can usually be done to all of your trim in a matter of 10 minutes or so.
First, we are going to apply a small amount of product onto a foam applicator.
We will then spread the product evenly across the entire trim surface, making sure not to miss any niche nooks or crannies.
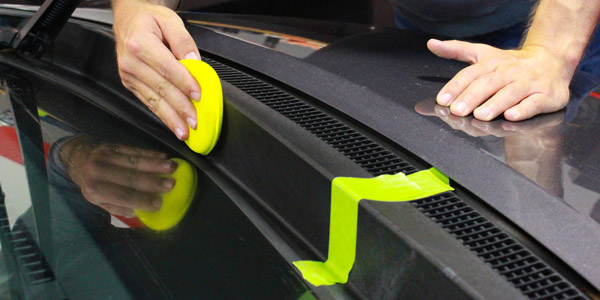
Then we want to buff off any remaining product immediately afterward with a clean and dry microfiber towel.

In as little as a minute, you can see the night and day difference between the treated and untreated sections of trim!
Step 3: The Glass
The glass gets just as much abuse and contamination as your paint surfaces do, but it is much more apparent on glass. Obviously, people are more likely to notice dirt and contamination on a clear surface than they are on a darkly colored surface.
This is why it is crucial that you clean the glass AFTER all other detailing has been done!
Any and all overspray that occurs during any of the other steps is going to also land on your glass 9 times out of 10. So, unless you planned ahead and taped off all the glass surfaces, cleaning your glass after detailing will make sure no one points to the spots you missed instead of the gloss your paint is giving off!
Cleaning your glass is incredibly simple in theory, but in practice, you’ll notice it never turns out quite right. This is because even with the best glass cleaner, you still need to use proper technique. That’s not to say that the cleaner you are using isn’t important though!
*** Quick tip: Unless you are single-handedly trying to support your local window tinter, using Windex on your car’s glass is a terrible idea! Besides, it’s not even that good of a glass cleaner. ***
It is important to use a glass cleaner that DOES NOT CONTAIN AMMONIA! Ammonia will ruin the adhesive on your window tint and cause it to slowly peel away from the glass. Even if you aren’t sure whether or not you have tint on your windows, avoid ammonia anyway, just to be safe.
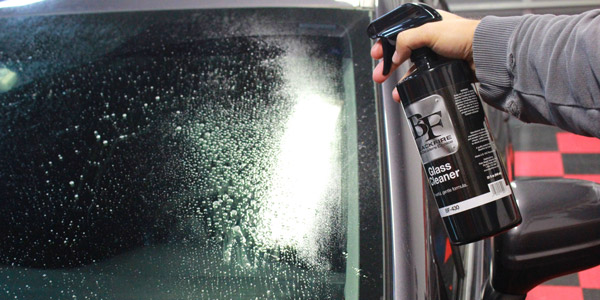
Our glass cleaner of choice is going to be the BLACKFIRE Glass Cleaner. This is an ammonia-free glass cleaner that has a long enough work time to get the spots off your glass, but not so long that you risk streaking.
We will start off by spraying a generous amount of BLACKFIRE Glass Cleaner directly onto the surface of the glass.
Now, when it comes to working the cleaner across the surface and wiping it off, here is a little trick: Wipe left to right on the exterior side of the glass, and up and down on the interior side. This way, if you do by chance get any streaks, you will know which side of the glass they are on.
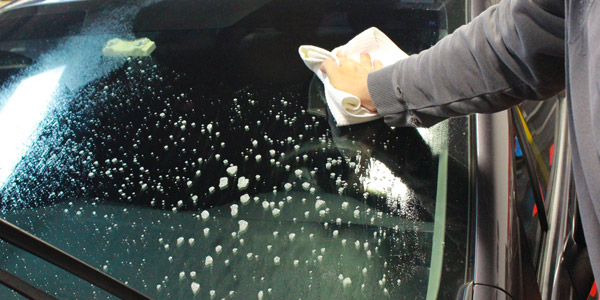
Make sure to wipe the glass entirely dry before moving on to the next pane! Otherwise, you are risking some serious streaks!
If the glass is particularly dirty, it may take a couple applications before all the road grime, dirt, and contamination is completely gone.
Step 4: Step Back and Revel in Results!

We hope that this informational series has helped you makes heads or tails of the crazy process that is detailing your car. As you can tell, it is a long a complicated process, but with enough research (and plenty of junk hoods) you too will be able to start detailing cars like a pro!

